Px Editor
A downloadable tool for Windows
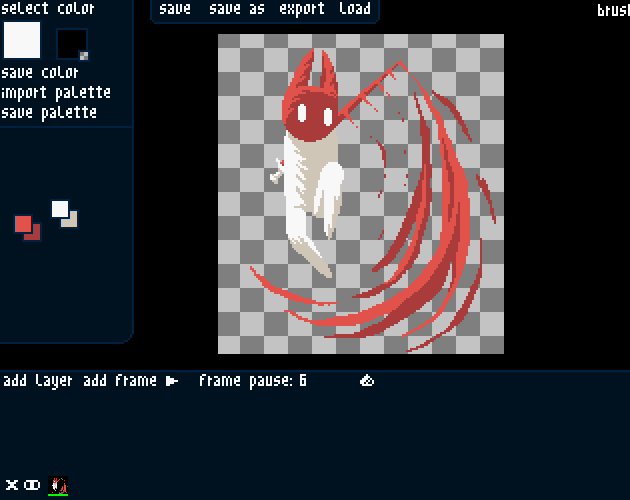
Px Editor is a pixel art tool that I designed to work efficiently with my workflow. It supports things like animation, layers, and palettes, but isn't at the complexity level of something like Aseprite. Since this is what I use for pixel art, I'll add features as I need them.
Px Editor was written in Python 3 and Pygame; feel free to check out the source code!
Features
Full Animation & Onion Skinning
Advanced Palette System
Selection, Floodfill, and More

Layers and Opacity
Make sure you read "manual.txt" in the tool's files. It explains everything.
Download
Click download now to get access to the following files:
Development log
- Working on a new pixel art tool!Dec 19, 2020
Comments
Log in with itch.io to leave a comment.
Hi , can you please tell me in Wich language is this made with
i will try it first <3
I am not an expert in this but i suggest making a github repository. love your pygame creations btw
How you've make the executable of the pygame code?
Fluffy made a video about it:
Ok thanks :)
It works so well. Thx :)
wow
i got these errors when opening the tool. What should i do ? =(((![]()
yeah this toll will help me so much, but how I can to install it on my pc...
Man very nice app and amazing website / games. one thing, why don't you put this PX Editor into a github repository? A part of getting more popular but you also allow version control and especially other people can contribute to make it better. Just saying.
I still plan on making a second version (a complete overhaul) of this. For that I will use GitHub. I wouldn't expect to see that until next year at the earliest though.
Awesome,looking forward for it
So as a Mac user, would I simply have to download the source code and then use pyinstaller to package for my machine again? Or would more modding be required such as editing the code. Just got here from your video ;D
EDIT: After packaging myself with pyinstaller and running the source code, its kinda breaks. All the text is highlighted in white and some features don't work. Nevertheless, amazing tool and programming, understandable why it doesn't work on Mac. :)
I've talked to some of the Pygame developers about it (this has been occurring with my other projects when people try to run it on Mac) and supposedly the lower level stuff that SDL (which is what Pygame runs on) is interfacing with for Macs is completely different from what Windows/Linux use. This ends up causing a bunch of inconsistencies.
Oh no wonder the problems with the graphics stuff. The basic functionalities like buttons seem to be working, because their coded with pygame/tk(?)
iirc, it's specifically graphics related stuff that's very different, so the actual buttons and logic should be more reliable.
Yeah I ran it again, the buttons n stuff do properly "click" and detect the mouse hovering etc
I have a problem where every time I try to save it crashes (I'm using the mac/source code, I don't have windows)
You'll probably have to mod the tool for your operating system then.
how do I do that
When android version?
Could you make a linux version of this please(:
It works on linux if you just use the source code. It's written in Python, so you just gotta install Pygame.
Oh ok thank you
Sorry to ask but where do i find this
it might be "python -m pip install pygame" or "python3 -m pip install pygame"
How did you make the window work with both pygame and tkinter? I've been trying to figure that out for a very long time. Great tool though, I really like it!
Download for mac?
I dunno why but every time I install the last version it says the program is missing the MSVCR100.dll file and I can't get it to work... hmmm... If you install that file the program works fine. I also dunno why the window is so small, maybe it was thought to be like this...
simply <3 thanks
thank you, this tool is good like aseprite. But I edit the code to increase the window size. I just download the source code and use it
Mind if I compile this for the raspberry pi and release it (will give credit)?
i can't even make a rectangle move and here you made that with pygame ;-;
it's just really nice
yeah, I just want to make a rectangle to move 1 bit but it can't ._.
What module you use to create this app?
Python/Pygame.
guys use libresprite if u dont wanna buy aseprite
ikr
probably depends on your python/pickle/pygame version
for some reason it works veeery slowly.
Honestly this is better than aseprite
I use Aseprite now. lol
I don't because it c o s t s m o n e y
~For the same reason I said that this is better thn aseprite lol
You can get Aseprite for free. Just build it from source. I compiled it on Linux and Windows without any problems.
same i just compiled it
(edit: i bought aseprite)
dude thats sick
How do you use it, I've downloaded it and can't figure out how to make it work. Btw your games are really fun!
Alright, I've got it working now, but the screen is so small ... XD Im so bad at figuring things out!
It also keeps crashing when I try changing number values (; _ ; ) help...
read manual.txt
I've looked into it, there doesn't seem to be anything in the manual file about resizing the window to make it bigger (ex. making it full screen), nor about if someone has issues with it crashing when changing any number value. I'm very sorry for the trouble I'm causing, I don't mean to waste your time, I'm just having a lot of trouble figuring things out... Other than that however I really have loved working with it, it's very simplistic while being very resourceful in the start of creating my pixel art.
Idk if this is the wrong manual or if I'm being stupid but here is what I see( again sorry for being so problematic....)
=== colors ===
You have 2 colors selected at any time. The first is your primary (black by default). This is what you'll be using most of the time. You draw with it using left click. The secondary color (white by default) is your background color. This color is set to transparent within Px Editor. Transparency is important for layering and selection, but Px Editor doesn't export with an alpha channel. Changing the secondary color would change what color is considered transparent.
Click "select color" to create a new color. Click the numbers next to "raw RGB value:" to enter new color values (0 to 255 per color separated by ";") or use the sliders below. Click "save" after you're satisfied with your new color.
=== palettes ===
Palettes work a bit differently in Px Editor compared to most pixel art tools. Colors in your palette can be rearranged as you please just by dragging. Click "save color" to add your primary color to your palette. Left clicking a color in your palette will set your primary color to it while right clicking it will set your secondary color to it. Middle clicking a color in your palette will delete it.
You can save palettes using the "save palette button". Click "import palette" to load palettes either from images or Px Editor's palette files (.pxep).
=== saving/loading/exporting ===
Use "save" and "save as" for saving your project as a Px Editor file (.pxe). This saves all the project specific data. Use "load" to load PNG files or Px Editor projects (.pxe). Use "export" to export your project to PNG file(s). If you have multiple frames, multiple images will be created and numbers will be added to the file name you provide.
=== the stuff in the top-right corner ===
The brush size is visible in the top-right corner. Use ctrl + scroll wheel to change the brush size.
The numbers below the brush size are for the resolution of the canvas. Click them to change the canvas resolution. (two numbers separated by a ";")
=== canvas view ===
Use the scroll wheel to change the zoom on the canvas.
Middle click and drag to move the canvas around.
=== animation and layers ===
The stuff on the bottom of the window is all for layer/frame management. Each square is a preview of an individual layer (separated vertically) inside a frame (separated horizontally). The preview images with the colored bars show which frame you have selected and the green bar shows which layer you have selected.
Click "add layer" to add a layer and click the layer's preview image to switch to editing it. Click the "X" on the left to delete the layer.
Click the eye-looking icon to change the opacity of a layer (0 to 255 with 255 being opaque).
Click "add frame" to copy your current frame and add a new frame to the immediate right of the frame you have selected. Drag a preview (with left click) to rearrange the frame order. Middle click a preview in a frame to delete the frame.
Click the play button to play the animation and click it again to pause it. Click the number next to "frame pause:" to adjust the pause between frames. (measured in 1/60th of a second)
Click the button to the right of the frame pause option to toggle the onion skinning.
=== tools ===
There are a few key-bound tools in Px Editor.
The most useful one is probably the color picker. Hold left control and click anywhere in the canvas to set that color to your primary color.
Hold F and click on the canvas to floodfill with your primary color.
Use Left Control + Z to undo and Left Control + Y to redo.
Hold S, click, (you can release S at this point) and drag to select a portion of the canvas. This allows many other features. Right click to deselect.
Click and drag (anywhere) to move around the selected portion. You can also switch frames during selection to move a selected portion between frames.
Hold R, click, and drag (anywhere) to resize the selected portion.
Press F to flip the selected portion horizontally or press Left Shift + F to flip the selected portion vertically.
Use Left Control + C to copy the selected portion.
While nothing is selected, use Left Control + V to paste whatever you previously copied.
Use Left Control + X to delete the selected portion.
=== developer notes ===
Px Editor is what I (DaFluffyPotato) use for pixel art, so I will add features as I need them.
Check for updates at the project's page: https://cmlsc.itch.io/px-editor
This is technically my 3rd time writing Px Editor from the ground up (hence the "3" everywhere). I've been using Px Editor versions 1 to 2 since 2016 for my pixel art in combination with MS Paint (limited but efficient). Px Editor 3 is meant to cover uses where MS Paint was more efficient so that I only need 1 application.
If you found this tool useful, please follow me on Twitter (@DaFluffyPotato) and consider donating for your copy of Px Editor at https://cmlsc.itch.io/px-editor. ^-^
Nice work.
i think the best free pixel art program
Really good work on this!
awesome program!